Aller au contenu


firened

Inscrit(e) (le) 12 juil. 2020
Déconnecté Dernière activité avril 20 2024 02:59
*****

#117238 [Guide] How To Create Timelapse Videos With Your Robot

Posté par firened - 18 novembre 2022 - 08:33

UPDATE 2022.11.22: Find the updates about this Guide on GitHub: https://github.com/e...spberry-vigibot

## how to create timelapse videos with your robot
Vigibot has the possibility to take photos regularly. the following script will regularly create timelapse videos using the photos, the video can then be played directly from the Vigibot website.

Note: if your camera has a motorized IR cut filter, only do step 5 and check if it clicks every minute when it's dark. this would wear out the motorized IR cut filter rather quickly. an option is to unplug the motorized IR cut filter connector on the camera module. if you have other ideas, let me know.

1. login into your robot over ssh

2. add a tmpfs entry, run:
`sudo nano /etc/fstab`
add:
```
tmpfs /tmp tmpfs defaults,noatime, nosuid,size=20m 0 0
```

3. run `sudo reboot`

4. run `df` and make sure there's a `/tmp` entry.

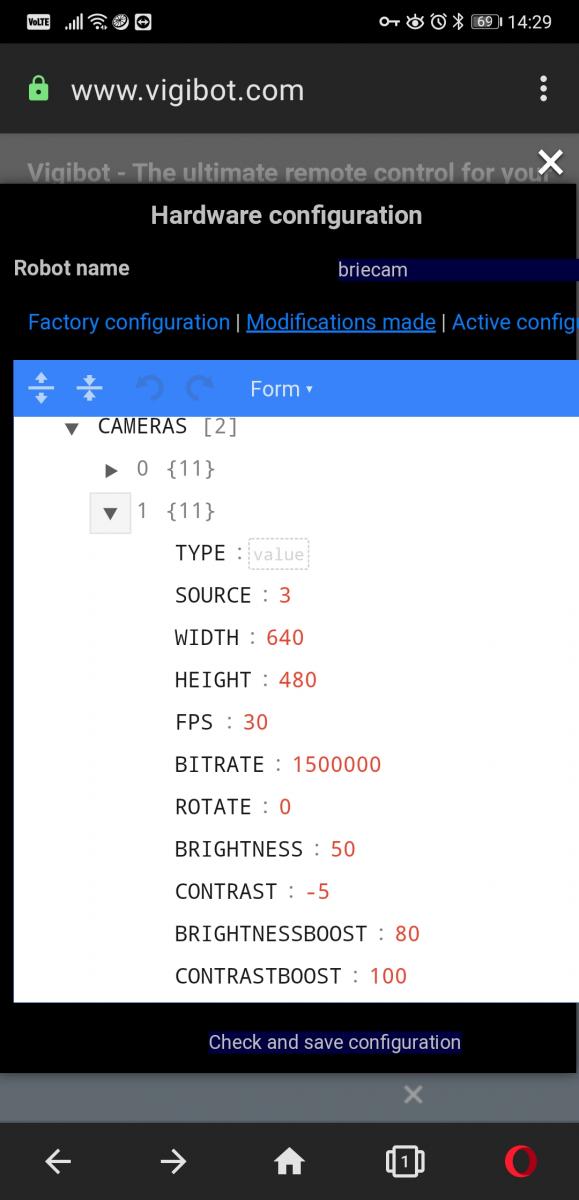
5. In hardware config set `SNAPSHOTSINTERVAL` to `1` to take a photo every 1 minute.
Note: Snapshots are publicly accessible on https://vigibot.com/captures/

6. create folder
```
sudo mkdir /usr/local/timelapser/
```

7. install script
```
sudo wget -P /usr/local/timelapser/ https://raw.githubus...n/timelapser.sh
```

8. make script executable
```
sudo chmod +x /usr/local/timelapser/timelapser.sh
```

9. run the script manually and leave it running
```
sudo /usr/local/timelapser/timelapser.sh
```

10. open a second ssh connection to your robot

11. run
```
sudo ln -s /usr/bin/ffmpeg /usr/local/vigiclient/processdiffintro
```

12. run
```
sudo ln -s /tmp/timelapse_short.mp4 /usr/local/vigiclient/timelapse_short.mp4
```

13. run
```
sudo ln -s /tmp/timelapse_long.mp4 /usr/local/vigiclient/timelapse_long.mp4
```

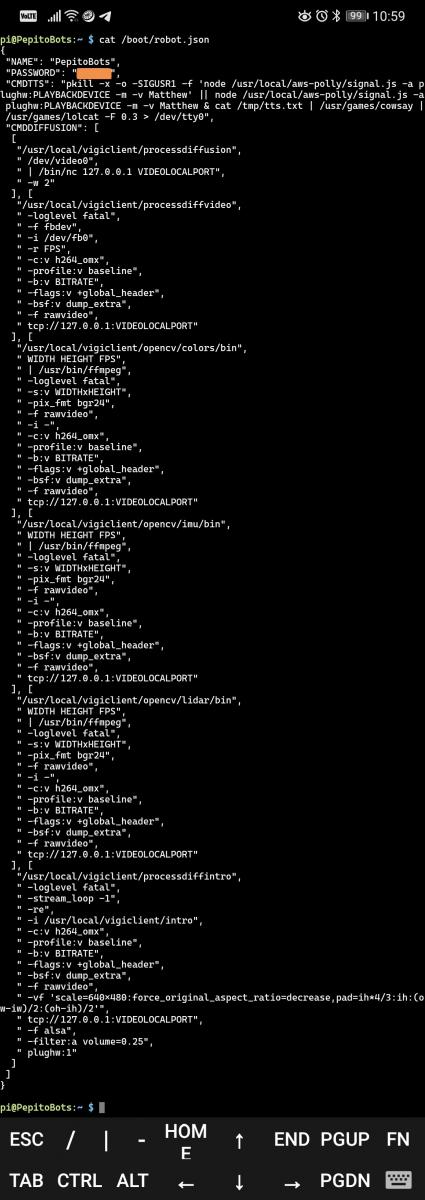
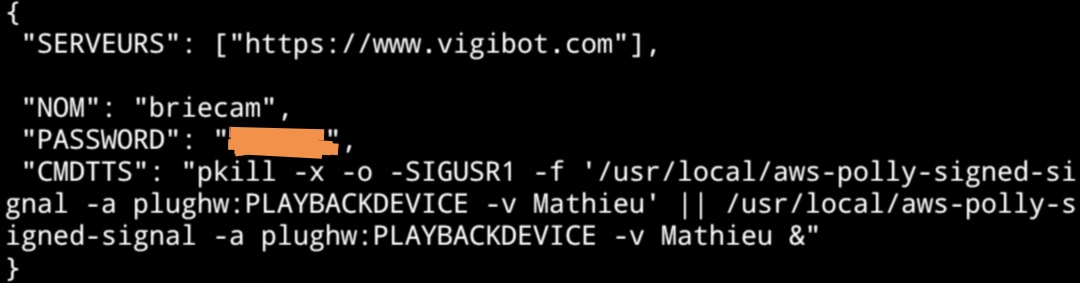
14. copy the whole `CMDDIFFUSION` array from `/usr/local/vigiclient/sys.json` into your `/boot/robot.json` file. (if Vigibot pushes an update to `sys.json` you will have to manually update/re-copy the array.)

15. add the 2 following entries to the copied `CMDDIFFUSION` array.
```
] , [
"/usr/local/vigiclient/processdiffintro",
" -loglevel fatal",
" -stream_loop -1",
" -re",
" -i /usr/local/vigiclient/timelapse_short.mp4",
" -c:v h264_omx",
" -profile:v baseline",
" -b:v BITRATE",
" -flags:v +global_header",
" -bsf:v dump_extra",
" -f rawvideo",
" -vf 'scale=640x480:force_original_aspect_ratio=decrease,pad=ih*4/3:ih:(ow-iw)/2:(oh-ih)/2'",
" tcp://127.0.0.1:VIDEOLOCALPORT"
] , [
"/usr/local/vigiclient/processdiffintro",
" -loglevel fatal",
" -stream_loop -1",
" -re",
" -i /usr/local/vigiclient/timelapse_long.mp4",
" -c:v h264_omx",
" -profile:v baseline",
" -b:v BITRATE",
" -flags:v +global_header",
" -bsf:v dump_extra",
" -f rawvideo",
" -vf 'scale=640x480:force_original_aspect_ratio=decrease,pad=ih*4/3:ih:(ow-iw)/2:(oh-ih)/2'",
" tcp://127.0.0.1:VIDEOLOCALPORT"
]
```
`robot.json` should then look something like this:
Screenshot_20221122_111634.jpg


16. restart the Vigibot client

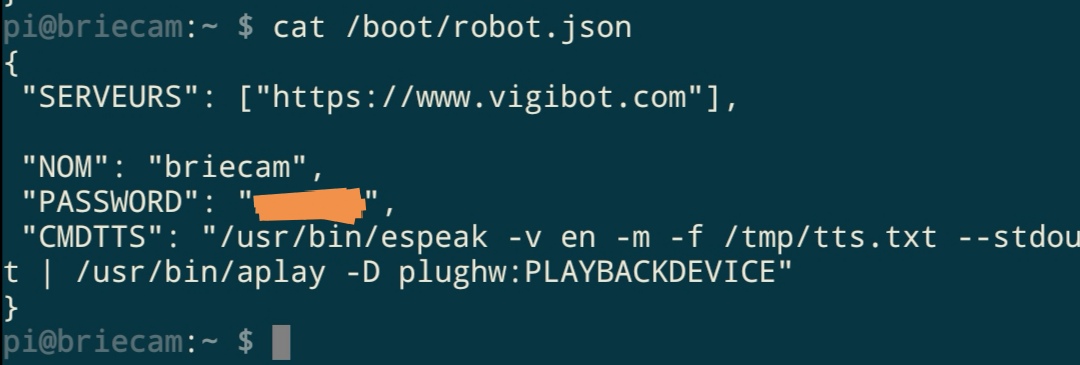
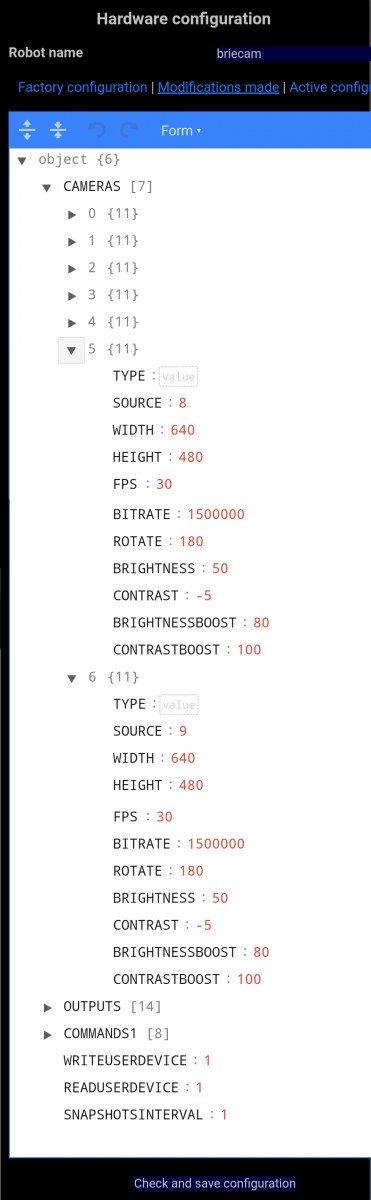
17. add 2x `CAMERA` entries in hardware config and set `SOURCE` to the `CMDDIFFUSION` array index number of your entry. In the above screenshot that's array index number `8` and `9`.
IMG_20221122_112140_e.png

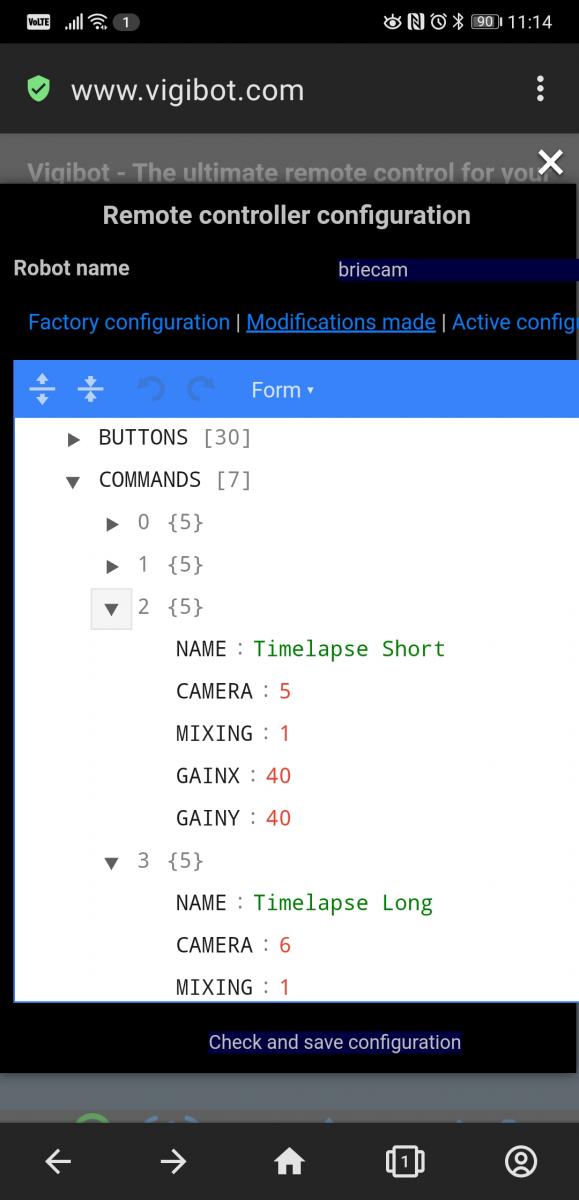
18. add 2x `COMMAND` entries in remote control config and set `CAMERA` to the created camera number. for me it was `5` and `6`.
Screenshot_20221122_111407_com.opera.browser.jpg

19. run `ls -l /tmp/`, check if `timelapse_short.mp4` and `timelapse_long.mp4` exist and check if it's working on vigibot.

20. if it works, automatically start it on boot: run `sudo nano /etc/rc.local` and add the following above the line `exit 0`
```
/usr/local/timelapser/timelapser.sh > /dev/tty0 &
```


### additional information / explanations:
thanks to Pascal for some of the above instructions.

it seems `enfuse` hdr images cause ffmpeg to fail. do not set `EXPOSUREBRACKETING`

### for future reference: manual cli commands
- use most recent images for short clip. takes about 10 seconds to create.
```
#target length: 1h in 6s playback
#'-sseof 2': use only most recent 2 seconds of input
#ffmpeg may be assuming a different fps value in its -sseof calculation
#'-r 10': set conversion to 10 fps
#'-filter:v fps=fps=30': force 30 fps output so thr 30 fps vigibot captures work
```
```
sudo ffmpeg -sseof -2 -r 10 -pattern_type glob -i "/home/pi/timelapse/*.jpg" -s 640x480 -vcodec libx264 -filter:v fps=fps=30/tmp/timelapse_short.mp4 -y
```

- long clip. takes about 90 seconds to create.
```
#target length: 24h in 40s playback
#"-sseof 52": use only most recent 52 seconds of input
#ffmpeg may be assuming a different fps value in its -sseof calculation
#'-r 30': set conversion to 30 fps
#'-filter:v "setpts=0.5*PTS"': only pass 50% of the frames, drop the others. this halves timelapse_long playback duration. (e.g. '0.2' would only pass 20% of the frames).
```
```
sudo ffmpeg -sseof -52 -r 30 -pattern_type glob -i "/home/pi/timelapse/*.jpg" -filter:v "setpts=0.5*PTS" -s 640x480 -vcodec libx264 /tmp/timelapse_long.mp4 -y
```


#116103 Servo benchmark stress test

Posté par firened - 25 juin 2022 - 02:26

UPDATE 2022.08.22: i didn't do a good job checking if the servos fit into the vigibot 3D files. unfortunately no metal gear 180° fit the vigibot 3D files. Doman DM-S0090MD 270° is the only metal gear servo that fits. Bokins plans on modifying the 3D files to make the DIYMore MG90S fit.


servo benchmark

goal: find robust servo models for a Minus-Type robot, in the hopes of extending time between servo failures and repairs. A per piece price of up to 20$ may be acceptable (N20 Pololu motors are also in that range). Minus-Type uses Micro Servos, also called 9g or sg90.

tested are the following servo models:

1) DIYMore SG90, plastic gear, 1$: recommended by Vigibot. are very quick which makes for a comically fast head nodding that people find hilarious. used on most of my robots (not WalterJakob's pan-tilt), personal failure rate is pretty high. EDIT: a resonating shaking may happen if the weight is too far from the axis line (used as pan servo on PepitoBots). i assume a drawback of the PID(?) regulator in use, which is probably also responsible for the desired comically fast nodding. same applies to DIYMore MG90S metal gear servo (used as pan servo on Briecam).

2) DIYMore MG90S, metal gear, 3$: had servos in the past that were DOA or didn't work on the lower battery voltage, unfortunately can't remember the exact reason. EDIT: read above servo #1 notes. EDIT: servo doesn't fit the current 3D printer files, requires adjustment.

3) TiankongRC TS90A, plastic gear, 270°, 3$

4) Doooman Hobby DM-S0090MD, metal gear, 270°, 6$

5) DFRobot DS-S006L, plastic gear, 9$: has a clutch to protect internal gears.

6) FiTec FS90MG, metal gear, 6$

7) Spektrum A330, plastic gear, 18$

8) Futaba S3114, plastic gear, 20$: "sub-micro" servo doesn't fit the current 3D printer files, requires adjustment.

9) HiTec HS-55+, plastic gear, 20$

10) HiTec HS-5055MG, metal gear, 30$

11) HiTec HS-65MG, metal gear, 30$
IMG_20220514_134716.jpg
↓ See conclusions or table "benchmark table.xlsx" for servo failure times.

test tries to simulate real world usage, common scenarios:

• to work with Vbat voltage 3.3V - 4.2V

• usually low weight/momentum movements (camera is pretty lightweight)

• people may accidentally hit the robot

• robot may drive into walls or objects with a servo absorbing the hit

• servo may want to move into an object and be limited by it

stress test setup:

pre-test #0: power from 3.3V and check if servo is even functional (most servo specifications state a minimum operating voltage of 4V). stop movement with hand, to check if it stops immediately / gets stuck.

main test #1: power from 3.3V, move back and forth (90° - 0°) automatically (eg 1 cycle every 6s to keep temperature low), no weight attached. from time to time force into obstacle (180° position can't be reached) to simulate real world interaction. let run every night and check how many minutes they last before they stop working.
IMG_20220522_191724.jpg
notes:

27.5.22: ran test #1 for 2400min (actual movement: 400min), 1 cycle (to 0° and back to 90°) every 6s, no failures.

-> replaced with 10A 3.3V power supply. increased speed from 1 cycle every 6s to 1 cycle every 2s. now movement from 3 servos overlap. can still be doubled. temperature IR meter: room = 27°C, servo avg = 35°C, servo max = 37°C.

28.5.22: ran test #1 for 480min (actual movement: 240min), 1 cycle every 2s no failures.

-> increased speed to 1 cycle every 1s. movement from 6 servos overlap, maximum possible. temperature IR meter: servo avg = 42°C, servo max = 46°C

29.5.22: ran test #1 for 800min (actual movement: 800min), 1 cycle every 1s,

-> divided runtime value by intensity to "actual movement" value.
Fichier joint  VID_20220606_211516.mp4   13,93 Mo   95 téléchargement(s)
Conclusion for Botkins / Minus-Type Robot:

6 servos had good behavior and more than acceptable runtime until failure.

Metal Gears:

• DIYMore MG90S: Okay. EDIT: .stl doesn't fit! 


• FiTec FS90MG: Okay. EDIT: .stl doesn't fit! 

• Doooman Hobby DM-S0090MD: Okay (Pan 270°: cable fatigue!)

Plastic Gears:

• DIYMore SG90: Okay

• TiankongRC TS90A: Okay (Pan 270°: cable fatigue!)

not recommend servos:

• DFRobot DS-S006L: Okay EDIT: auto-revert is annoying, drops objects in gripper by itself!


• Spektrum A330: No (failed early)

• Futaba S3114: No (.stl doesn't fit)

• HiTec HS-55+: No (Slow)

• HiTec HS-5055MG: No (3.3V unsupported)

• HiTec HS-65MG: No (Slow)

See table "benchmark table.xlsx" for servo failure times.

Fichier joint  benchmark table (1).xlsx   7,24 Ko   74 téléchargement(s)


#115084 Help - Freemove Car Kit on Vigibot

Posté par firened - 04 janvier 2022 - 11:17

oh very cool it's working.

there's a comma too much in the config:
    },
,
    {
      "NAME": "Right wheel rear",
probably why you got an invalid syntax error.
but glad it's running now!

regarding the rotation, i *think* you simply have to invert the GAINS8 on both "Right wheel" entries. remove the minus sign so it looks like this:
      "GAINS8": [
        1,
        1
      ],


#114101 How To Display Chat Text On Your Robot's Framebuffer

Posté par firened - 22 août 2021 - 06:30

it's possible to write anything to `> /dev/tty0` and have it show up on the framebuffer. can be output of your custom scripts or even animations:
`sudo apt install sl cmatrix libaa-bin`

a passing train:
`sudo -s`
`/usr/games/sl > /dev/tty0`

matrix:
`sudo -s`
`cmatrix > /dev/tty0`

or a fire:
`sudo -s`
`aafire > /dev/tty0`

or follow the instructions here for an aquarium:
https://www.tecmint....un-in-terminal/
`sudo -s`
`asciiquarium > /dev/tty0`


#114060 How To Display Chat Text On Your Robot's Framebuffer

Posté par firened - 17 août 2021 - 04:00

add a framebuffer view:
- add a CAMERA in hardware config with SOURCE: 1
- add a COMMAND in remote control config and use the created camera number

display chat text on framebuffer:
- install dependencies:
`sudo apt install lolcat cowsay figlet`
-then edit robot.json
`sudo nano /boot/robot.json`

for a cow with a speech bubble, add:
"CMDTTS": "cat /tmp/tts.txt | /usr/games/cowsay | /usr/games/lolcat -F 0.3 > /dev/tty0"
for big colorful text (thank you Pascal) :
"CMDTTS": "cat /tmp/tts.txt | /usr/bin/figlet -f small | /usr/games/lolcat > /dev/tty0"
there are lots of possibilities and adjustments possible with lolcat, figlet, cowsay, toilet or fortune and more. Add your favorite CMDTTS into the comments


#113891 Modification leds IR en leds blanches

Posté par firened - 13 juillet 2021 - 07:57

instructions in English:
1. bridge the 2 circled pins from the photo together using a small wire or wirewrap. use a magnifying glass and solder flux.
2. unsolder and bend both pins of the IR LED
3. turn module upside down, and heat the center pad on the backside to unsolder the IR LED case. use tweezer to gently pull on the IR LED case.

4. add some flux to the front center pad
5. place new LED and solder both pins of the new LED to the module
6. heat center pad on the backside to solder the new LED case to the front center pad. (max 5s)

backside looks like this:
IMG_20200617_112725.jpg

additional notes:
the white LED uses a similar current to the IR LED. i suggest turning the potentiometer and checking if it hets hot after 5min. it should only get warm.
3.3V is enough for all LED colors

by bridging the 2 pins on the photo above, it uses the 3.3V from the camera module instead of only 2.5V.

3W White LEDs like this:
https://a.aliexpress.com/_BTEedY


#112075 Vigibot Pi to multiple ESP32 WLAN Communications Example

Posté par firened - 15 décembre 2020 - 11:11

UPDATE 16.08.2021: find the updated code and guide on GitHub: https://github.com/e...-Multiple-ESP32

Note:
if you want to control a single ESP32 robot/gadget, use this guide instead:
https://www.robot-ma...ample/?p=111377
if you want to control multiple ESP32 robots/gadgets, continue.

This code allows control of multiple ESP32 robots or gadgets over WLAN using vigibot.
A raspberry is still required for the camera and needs to be on the same network. the serial data usually sent and received to an Arduino over UART ( https://www.robot-ma...cation-example/ ), is being sent over WLAN instead, allowing control of small robots or gadgets.
usage example: a pi with a camera watches an arena where multiple small ESP32 robots can be driven, the ESP32 bots do not have an on-board camera.
second usage example: open or close a door or toy controlled fron an ESP32.

1) assign your pi a static IP address
https://thepihut.com...-address-update

2) the pi needs to create a virtual serial point that's accessible over WLAN from the ESP32. install socat and ncat on your raspberry:
sudo apt install socat ncat
3) create a new script:
sudo nano /usr/local/ncat_esp.sh
4) paste the following code:
#!/bin/bash

sudo socat pty,link=/dev/ttyVigi0,rawer,shut-none pty,link=/dev/ttySrv,rawer,shut-none &

while true
do
  sleep 1
  sudo ncat -l -k -4 --idle-timeout 15 7070 </dev/ttySrv >/dev/ttySrv
  date
  echo "restarting ncat"
done
5) add permissions
sudo chmod +x /usr/local/ncat_esp.sh
6) run the script
sudo /usr/local/ncat_esp.sh
7) insert your
- network info
- raspberry host IP
- vigibot NBpositions (if different from default)
into the following sketch and upload it to your ESP32 from the arduino IDE using a usb cable.
note: only one esp can send a reply, make sure `client.write();` is only being called on one ESP32, all others only listen without sending any data back. (i recommend that one ESP32 sends data back, this way the vigibot robot won't wake up if the ESP32 isn't connected properly, which makes it easier to notice that it isn't working.)

Spoiler


8) open the serial monitor to confirm a successful WLAN and TCP client connection.

9) test the pi <-> ESP connection by logging in as root in a new shell (needs root) :
su -
and sending a test text frame:
echo '$T  hello from cli       $n' > /dev/ttyVigi0
the arduino serial monitor now says "hello from cli "

10)if it works add it to start at boot:
sudo nano /etc/rc.local
and add
/usr/local/socat-esp.sh &
above the line "exit 0".

11) add an entry on the vigibot online remote control config -> SERIALPORTS -> 3 with value: "/dev/ttyVigi0"

12) set WRITEUSERDEVICE to "3"

13) if you set up an ESP32 to send data back:
set READUSERDEVICE to "3"

restart the client and wake your robot up, if it wakes up then everything works.


related notes:
you can add a dummy client from the command line, in case you want to check if the vigibot frames are made available:   
sudo socat tcp:localhost:7070 -
   

similarly it's theoretically also possible to fetch this data from another computer or custom script/application.

there's an outage happening every few weeks or so, from which it doesn't recover.   
it looks like ncat doesn't open the socat socket if there's too much data buffered. the workaround is to manually clear the socat socket using
sudo cat /dev/ttySrv
and then cancel with `ctrl-c`


#111269 how to add an intro video to your robot

Posté par firened - 25 septembre 2020 - 10:59

it's possible to add a custom intro / instructions video to your robot.
be aware that this is to add an intro video to your existing robot with a real camera already in place, and not to add a «video only bot», check the #rules-documentation channel on discord for the official rules.
you can use the intro so people see your robot from a different perspective (like a mirror would), or for special instructions that may not be apparent.
also make sure that the intro video is not the default view of your robot (explained in step 5).
 
Standard setup, without video sound:

1) login via ssh and create a symlink to ffmpeg:

sudo ln -s /usr/bin/ffmpeg /usr/local/vigiclient/processdiffintro

2) create a second symlink to your video (change the Rick _Astley path) :

sudo ln -s /home/pi/Rick_Astley_Never_Gonna_Give_You_Up.mp4 /usr/local/vigiclient/intro

3) dublicate HARDWARE CONFIGURATION -> CAMERAS -> 0 , and set CAMERAS -> 1 -> SOURCE : 7
(use "TREE" or "TEXT" layout, SOURCE number is currently 7, but may change)
Screenshot_20200914_142914_com.opera.browser.jpg

4) dublicate REMOTE CONFIGURATION -> COMMANDES -> 0 , and set your created camera number in COMMANDES -> 0 -> CAMERA : 1
(use "TREE" or "TEXT" layout)

5) set REMOTE CONFIGURATION -> DEFAUTCOMMANDE : 1 , so that it doesn't always start playing when clicking the stop button. (instead requires pressing the prev/left button)
 
restart robot client, now your robot will play the video.
 
OPTIONAL: Play video sound on the robots speaker:
 
6) copy the whole "CMDDIFFUSION" array from /usr/local/vigiclient/sys.json into your /boot/robot.json file. (if Vigibot pushes an update to sys.json you will have to manually update/re-copy the array.)
 
7) in your robot.json, replace the ".../processdiffintro" array entry, with the following ffmpeg command. On the last line " plughw:1" enter your PLAYBACKDEVICE number, you can figure that out with the command `alsamixer` -> F6.

] , [
   "/usr/local/vigiclient/processdiffintro",
   " -loglevel fatal",
   " -stream_loop -1",
   " -re",
   " -i /usr/local/vigiclient/intro",
   " -c:v h264_omx",
   " -profile:v baseline",
   " -b:v BITRATE",
   " -flags:v +global_header",
   " -bsf:v dump_extra",
   " -f rawvideo",
   " -vf 'scale=640x480:force_original_aspect_ratio=decrease,pad=ih*4/3:ih:(ow-iw)/2:(oh-ih)/2'",
   " tcp://127.0.0.1:VIDEOLOCALPORT",
   " -f alsa",
   " -filter:a volume=0.25",
   " plughw:1"
  ]

robot.json should then look something like this:
Screenshot_20211022_110012.jpg
 
OPTIONAL 2: Route video sound directly into the Vigibot audio channel (without playing on the speaker):
Todo: ask Pierre

Thanks mike118 for the official vigibot logo animation that we can use in our custom intro video.
it's here as direct download:
https://www.robot-ma...igibotintro.mov
and here on youtube:


#110935 speaker test and review thread

Posté par firened - 30 août 2020 - 10:03

post your results here of all the speakers you've tested for a raspberry pi. 

simply post a photo or/and link, and say how good or bad the audio quality is. 

i find it difficult to find a small, easy to install speaker for my robots that has good audio quality so people understand the Text-To-Speech. but this thread is not limited to robots' TTS, and may be helpful for other applications too! 

so far i see these different methods of using a speaker on raspberry pi: 

  • 3.5mm speaker without amp (psa: usually too quiet) 
  • 3.5mm speaker with amp, maybe battery too 
  • a product with amplifier & speaker together 
  • separate amplifier & separate speaker 
  • bluetooth speaker, maybe with battery


#110796 how to use the Amazon Alexa voice on your robot

Posté par firened - 08 août 2020 - 10:48

please note that the following app connects to amazon using my access keys. a decent amount of requests are included so feel free to use it for your robot or your other raspberry projects. if you wish to use your own credentials, check out the GitHub repo, which describes the node source code without any access keys:
https://github.com/e...nment/aws-polly

to use the pre-authenticated executable:
1) because i can't put my access keys public, you will have to send me a PM or discord @firened#1228 .

2) add permission
sudo chmod +x /usr/local/aws-polly-signed-signal
3) install dependency
sudo apt install mpg123
4) edit your robot.json file
sudo nano /boot/robot.json
and add
,
"CMDTTS":"pkill -x -o -SIGUSR1 -f '/usr/local/aws-polly-signed-signal -a plughw:PLAYBACKDEVICE -v Mathieu' || /usr/local/aws-polly-signed-signal -a plughw:PLAYBACKDEVICE -v Mathieu &"
it should then look like this:
Screenshot_20200808_113733.jpg

to use a different voice, replace "Mathieu" twice in your robot.json file with a different voice-id.
Listen to some voice examples:
https://www.amazonaws.cn/en/polly/
Full list of available voices: (write voice names without phonetics. Léa -> Lea)
https://docs.aws.ama.../voicelist.html

see all these TTS related posts:
Amazon Alexa TTS
picoTTS
Google TTS
Enable espeak markup language
dectalk (moonbase Alpha) TTS


#110519 How to enable markup language tags for the espeak TTS Voice on your robot

Posté par firened - 13 juillet 2020 - 03:10

here a few fun phrases to make the TTS sing or otherwise mess with it.
because every TTS engine works differently, i will only list phrases that work well for the espeak TTS with enabled markup language.
add your own fun phrases for this TTS in the comments!
first some phrases for espeak without markup language:
 
oinkoinkoinkoinkoinkoinkoinkoinkoinkoinkoinkoinkoinkoinkoinkoinkoinkoinkoinkoink
 
umnpkkrrrkdumnpkkrrrkkpkkrrrkkpkkrrrkkpkkrrrkkpkkrrrkkpkkrrrkkpkkrrrkkpkkrrrkkpkkdumndpkkrrrkumndumndumndumnpkkrrrkdumndumndumzznbschkrrrkkpkkrrrkkpkkrrrbschkrrrkkpkkrrrkkpkkrrrumndumnpkkrrrkdumndumnpk
 
Your Motercycle goes zolczk zolczk zolczk zolczk zolczk zolczk zolczk zolczk zolczk zolczk zolczk zolczk zolczk zolczk zooik zoooisk
 
here are more TTS phrases that you can use (the "/tts" is not necessary) :
https://techwafer.co...cord-tts-lines/
 
and here phrases with enabled markup language:
 
<prosody pitch="0" rate="0">daaaaaaaaaaaaaaaaaaaaaaaaaaaaaaaaaaaaaaaaaaaaaaaaaaaaaaaaaaaaaaaaaaaaaaaaiiiikikikikikikikklklkllllklklllkoooolokolooooooooooooooooooooooooooooooooooooah</prosody>
 
<voice gender="female">wowowowowowoowowowowowowowoowowowowowowowoowowowowowowowowowo
 
<prosody pitch="95" rate="0.8">dah</br>dah</br>dah</br><prosody pitch="80" rate="0.5">dah<prosody pitch="180" rate="2"></br>dah<prosody pitch="170" rate="0.5">dah</br>
 
one breath from my smoking π -<prosody pitch="80" rate="0">aaaaand<prosody pitch="120" rate="0">wowowow<prosody pitch="200" rate="0">wowowowow<prosody pitch="0" rate="0">wowowwowowowo <prosody pitch="200" rate="0">wowowowowo
 
<prosody pitch="0" rate="0"> lol
 
<prosody pitch="200">lol
 
my motorbike's last moments sounded like <prosody pitch="0" rate="1.2"> oinkoinkoinkoinkoink<prosody pitch="0" rate="0.8"> oinkoinkoinkoinkoink<prosody pitch="0" rate="0.8"> oinkoinkoinkoinkoink<prosody pitch="0" rate="0"> oinkoinkoinkoinkoink err
 
the rain goes <prosody pitch="0" rate="0"> plip<prosody pitch="200">plop<prosody pitch="0" rate="0"> plip<prosody pitch="200">plop<prosody pitch="0" rate="0"> plip<prosody pitch="200">plop<prosody pitch="0" rate="0"> plip<prosody pitch="200">plop

<prosody pitch="0" rate="0"> my <prosody pitch="200">rupteur <prosody pitch="0" rate="0"> is<prosody pitch="200">micro

<prosody pitch="200" rate="0.1"> can - <prosody pitch="100">you hear - the choppers sing: <prosody pitch="0" rate="30"> oinkoinkoinkoinkoinkoinkoinkoinkoinkoinkoinkoinkoinkoinkoinkoinkoinkoinkoinkoinkoinkoinkoinkoinkoinkoinkoinkoinkoinkoinkoinkoinkoi

<prosody pitch="80">so - long - <prosody pitch="30">and thanks <prosody pitch="10"> for all the fish

<prosody pitch="0" rate="0"> ufhfhfhfhfhfhfhfhfhfhfhfjfhfjfhfhfhfhfhfhfhfhfjfjfhfhhfhfufjfhfdhfhfhfhfhfhdhfhfhfhfhfjfjfjfjfffhfhfhfhhfjfhfhfhfhfhfjfjfhfhffhgu


#110518 How to enable markup language tags for the espeak TTS Voice on your robot

Posté par firened - 13 juillet 2020 - 02:42

speech synthesis markup language (SSML) is mostly for making the TTS sing and make it sound silly in various ways. mostly for laughs.
to enable the espeak markup language, add:
,
"CMDTTS": "/usr/bin/espeak -v en -m -f /tmp/tts.txt --stdout | /usr/bin/aplay -D plughw:PLAYBACKDEVICE"
to your /boot/robot.json file. it should look like this:
Screenshot_20200723_204442.jpg
 
"-v" for language: en, fr, de,..
"-m" to enable markup tags.
valid markup tags here: http://espeak.sourceforge.net/ssml.html 
a chat message:
<prosody pitch="0" rate="0"> lol
will say lol in a deep, slow voice.
normal pitch is "50".
normal rate is "1", double speed is "2".
 
see all these TTS related posts:
Amazon Alexa TTS
picoTTS
Google TTS
Enable espeak markup language
dectalk (moonbase Alpha) TTS


#110517 How to use the picoTTS Voice on your robot

Posté par firened - 13 juillet 2020 - 01:44

Merci a Pascal pour ce manuel!
Voici comment installer PicoTTS la synthèse vocale d'Android sur un robot : 
wget http://ftp.us.debian.org/debian/pool/non-free/s/svox/libttspico0_1.0+git20130326-9_armhf.deb 
wget http://ftp.us.debian.org/debian/pool/non-free/s/svox/libttspico-utils_1.0+git20130326-9_armhf.deb 
sudo apt-get install -f ./libttspico0_1.0+git20130326-9_armhf.deb ./libttspico-utils_1.0+git20130326-9_armhf.deb  
Et ajouter dans votre /boot/robot.json sans oublier la virgule sur la ligne précédente :
,
"CMDTTS": "cat /tmp/tts.txt | pico2wave -l fr-FR -w /tmp/tts.wav && /usr/bin/aplay -D plughw:PLAYBACKDEVICE /tmp/tts.wav" 
et pour ceux qui trouvent la voix d'Android vraiment trop étoufée il suffit d'ajouter des aigus comme ceci 
sudo apt install sox 
Et la ligne avec le traitement de son devient :
,
"CMDTTS": "cat /tmp/tts.txt | pico2wave -l fr-FR -w /tmp/tts.wav && /usr/bin/sox /tmp/tts.wav /tmp/sox.wav treble +15 && /usr/bin/aplay -D plughw:PLAYBACKDEVICE /tmp/sox.wav"
see all these TTS related posts:
Amazon Alexa TTS
picoTTS
Google TTS
Enable espeak markup language
dectalk (moonbase Alpha) TTS


#110516 Modification leds IR en leds blanches

Posté par firened - 13 juillet 2020 - 01:36

thanks for the writeup Microrupteur! :)

in case someone finds this useful, here is the schematic of the original circuit:
Screenshot_20200616_123831.jpg


#110515 How to use the Google Assistant Voice on your robot

Posté par firened - 13 juillet 2020 - 09:45

here a few fun phrases to make the TTS sing or otherwise mess with it.
because every TTS engine works differently, i will only list phrases that work well for the online google TTS.
add your own fun phrases for this TTS in the comments!
 
I stubbed my toe and said OOOO.OOOOO?OOOOO,OOO;OOOO-OOO!OOOOOO-OOOOOO.OOOO!OOO,OOOOO-OOO?OOOO.OOO;OOOO-OOO.OOOO!OOO?OOOO
 
waca waca waca wacawaca waca waca wacawaca waca waca waca
 
rattatacatakatatatat rattatacatakatatatat rattatacatakatatatat rattatacatakatatatat
 
lll i lii.i lili. l i liii l i llll.lllllilllil.i ll ol ilili l illiiii l i l.i.l.l.i ilil.ii.l
 
ddd.d..ddddd.d-ddh-dd-d-dd:dd:dddddd.d..ddddd.d-ddh-dd-d-dd:dd:dddddd.d..ddddd.d-ddh-dd-d-dd:dd:ddd
 
I like music Musicaeuaeuaeuaeuaeuaeua Musiceuaeuaeuaeuaeuaeuaeuaeuaeuaeuaeuaeuaeuaeuaeu
 
gaga-gaga.gagaga-gag?ag-gaga,gaga!aaga.g:aga,aga,-gaga.gaga.ga.ga,ga!gagahgagaga.g?agag,gaga-gaggaa
 
i went to the dentist and he said to open my mouth and say a aa aa aa aa aa aa aa aa aa aa aa aa aa aa aa aa aa aa aa aa aa aa aa aa aa aa aa aa aa aa aa aa aa aa aa aa aa aa aa a.
 
so i opened my mouth and said:  a aa aa aa aa aa aa aa aa aa aa aa aa a aa aa aa aa aa aa aa aa aa aa aa aa aa aa aa aa aa aa aa aa aa aa aa aa aa aa aa aa aa aa aa aa aa aa aa aa aa aa aa a a aa aa aa aa aa aa aa aa aa aa aa aa aa aa aa aa aa aa aa
 
cee cee ceeceeceeceeceeceecee cee ceeceeceeceeceeceecee cee ceeceeceeceeceeceecee cee ceeceeceeceeceeceecee cee ceeceeceeceeceecee
 
it hurts when i ππππππππππππππππππππππππππππππππππππππππππππππππ

eueu eueueueu eueu eueueueu eueu eueueueu eueu eueueueu eueu eueueueu eueu eueueueu

my rabbit likes ^^^^^^^^^^^^^^^^^^^^^^^^^^^^^^^^^^^^^^^^^^^^^^^^^^^^^^^^^^^^^^^^^^^^^^^^^^^^^^^^^^^^^^^^^^^^^^^^^^^^^^^^^^^^^^^^^^^^^^^^^^^^^^^^^^^^^^^^^^^^^^^^^^^^^^^^^^^^^^^^^^^^^^^