


How to add your raspberry pi robot on Vigibot.com
By : Vigibot & Robot Maker

Add your own robot on Vigibot is easy
- Create your Vigibot account on www.vigibot.com
- Click on "Management" and then "Add a Robot". Choose your robot name , robot type and robot password and then submit. Keep them in mind you will need them in a few steps.
- Download the provided image vigimage.zip
- Unzip vigimage.zip and write the image vigimage.img on your micro SD card. (On Windows, you can use " HDD Raw Copy Tool ") But any other tool you may already use like win32diskImager (windows) or ApplePiBacker (mac) can be used for this step.
- Then open the /boot partition in the sd card.
- Modify "wpa_supplicant.conf" file according to your wifi network configuration. (Change the "Demo" SSID and the "Default" password to match your own Wi-Fi network)
- Modify "robot.json" according to the robot name and robot password you previously choose. ( Change the "Demo" login and the "Default" password)
- Install the sd card in your Raspberry pi with the camera installed and then power it up (Due to compilation process, the first boot take few minutes before robot to appear on the website ( something like 10min ) : do not power off the Raspberry Pi during this time )

- Take a look at the server www.vigibot.com. Your robot should appear first in the robot list under "My robots". Voilà! By default, you are the only one that can see your robot. Configure the permissions if you want to change it but keep in mind that doing so you are streaming live video as people do it on twitch and youtube live. You are responsible for the content you stream.
Note that SSH is enabled by default in the provided image so please remember to change the default " raspberry " password of the "pi " account for security reasons.
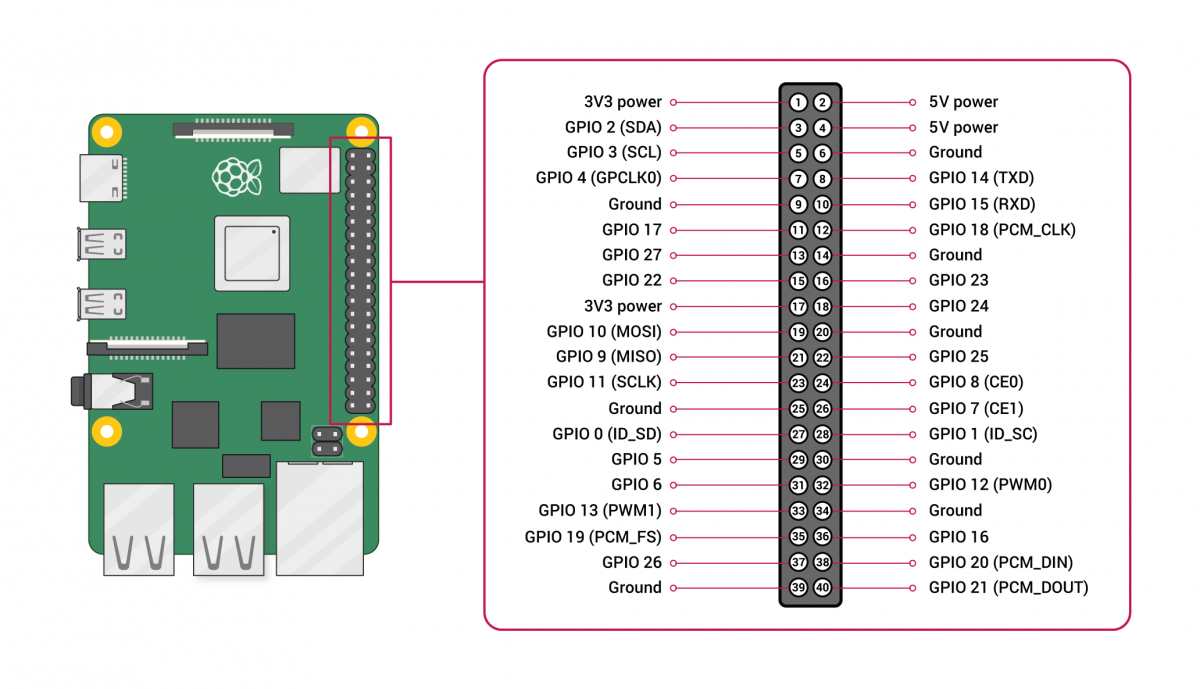
You can now connect what you want on your Raspberry Pi GPIOs.
By default, the first pair of servomotors (camera pan and tilt servo) need to be connected to GPIO 5 (pan ) and 6 (tilt) of the raspberry pi.
The second pair of servomotors (gripper) should be connected to GPIO 7 (claw) and 8 ( titlt).
360° endless servomotors to move the robot should be connected to GPIO 26 ( left) and 27 (right).
LEDs, lasers, buzzer, relay and other stuff like that should be connected to GPIO 16 to 23.
For Arduino users, you can also choose to connect an Arduino or another microcontroller to the Rasperry pi using UART GPIO 14 and 15.
If needed : Customize your configuration : All these default configuration can be changed to match with your own robot set up. You can use as many servomotors as you want, and if not using 360° endless servomotors or, way better, a board converting standard DC servo to 360° endless servomotors , you can set it up to drive dc motors with PCA9865 board, L298n board or L9110 board...
For Arduino user here is the Serial Arduino code example.
We still have a lot of tutorial to write but if you have questions feel fre to post them on the forum or on the Vigibot discord. You will receive help and technical support. 
Note : When we talk about GPIO numbers on your raspberry pi we are talking about numbers like the one presented on this raspberry pi pinout diagram :
- UPS Hat V1.0, all integrated hats for robots working with 1S batteries (only compatible with 1S batteries) providing charge, 5V 3A supply, and batterie fuel gauge.
- Vigiboard Hat, simpler than the previous one but can be used with any kind of battery.
For more information look at the provided documentation :
=> Documentation UPS HAT
=> Documentation Vigiboard HAT


