UPDATE 2022.11.22: Find the updates about this Guide on GitHub: https://github.com/e...spberry-vigibot
## how to create timelapse videos with your robot
Vigibot has the possibility to take photos regularly. the following script will regularly create timelapse videos using the photos, the video can then be played directly from the Vigibot website.
Note: if your camera has a motorized IR cut filter, only do step 5 and check if it clicks every minute when it's dark. this would wear out the motorized IR cut filter rather quickly. an option is to unplug the motorized IR cut filter connector on the camera module. if you have other ideas, let me know.
1. login into your robot over ssh
2. add a tmpfs entry, run:
`sudo nano /etc/fstab`
add:
```
tmpfs /tmp tmpfs defaults,noatime, nosuid,size=20m 0 0
```
3. run `sudo reboot`
4. run `df` and make sure there's a `/tmp` entry.
5. In hardware config set `SNAPSHOTSINTERVAL` to `1` to take a photo every 1 minute.
Note: Snapshots are publicly accessible on https://vigibot.com/captures/
6. create folder
```
sudo mkdir /usr/local/timelapser/
```
7. install script
```
sudo wget -P /usr/local/timelapser/ https://raw.githubus...n/timelapser.sh
```
8. make script executable
```
sudo chmod +x /usr/local/timelapser/timelapser.sh
```
9. run the script manually and leave it running
```
sudo /usr/local/timelapser/timelapser.sh
```
10. open a second ssh connection to your robot
11. run
```
sudo ln -s /usr/bin/ffmpeg /usr/local/vigiclient/processdiffintro
```
12. run
```
sudo ln -s /tmp/timelapse_short.mp4 /usr/local/vigiclient/timelapse_short.mp4
```
13. run
```
sudo ln -s /tmp/timelapse_long.mp4 /usr/local/vigiclient/timelapse_long.mp4
```
14. copy the whole `CMDDIFFUSION` array from `/usr/local/vigiclient/sys.json` into your `/boot/robot.json` file. (if Vigibot pushes an update to `sys.json` you will have to manually update/re-copy the array.)
15. add the 2 following entries to the copied `CMDDIFFUSION` array.
```
] , [
"/usr/local/vigiclient/processdiffintro",
" -loglevel fatal",
" -stream_loop -1",
" -re",
" -i /usr/local/vigiclient/timelapse_short.mp4",
" -c:v h264_omx",
" -profile:v baseline",
" -b:v BITRATE",
" -flags:v +global_header",
" -bsf:v dump_extra",
" -f rawvideo",
" -vf 'scale=640x480:force_original_aspect_ratio=decrease,pad=ih*4/3:ih:(ow-iw)/2:(oh-ih)/2'",
" tcp://127.0.0.1:VIDEOLOCALPORT"
] , [
"/usr/local/vigiclient/processdiffintro",
" -loglevel fatal",
" -stream_loop -1",
" -re",
" -i /usr/local/vigiclient/timelapse_long.mp4",
" -c:v h264_omx",
" -profile:v baseline",
" -b:v BITRATE",
" -flags:v +global_header",
" -bsf:v dump_extra",
" -f rawvideo",
" -vf 'scale=640x480:force_original_aspect_ratio=decrease,pad=ih*4/3:ih:(ow-iw)/2:(oh-ih)/2'",
" tcp://127.0.0.1:VIDEOLOCALPORT"
]
```
`robot.json` should then look something like this:

16. restart the Vigibot client
17. add 2x `CAMERA` entries in hardware config and set `SOURCE` to the `CMDDIFFUSION` array index number of your entry. In the above screenshot that's array index number `8` and `9`.

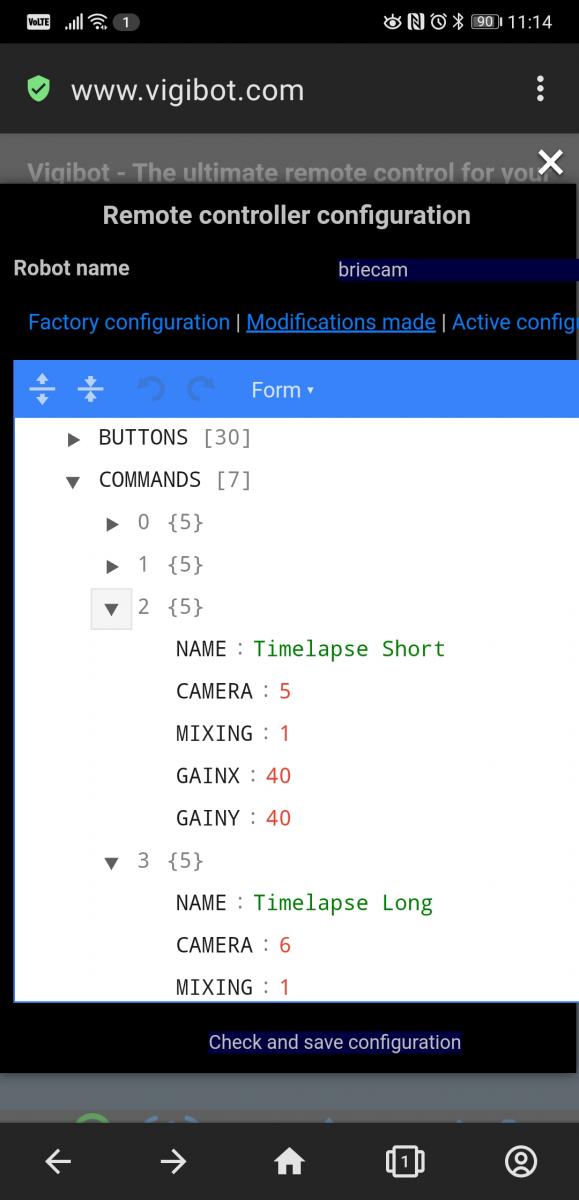
18. add 2x `COMMAND` entries in remote control config and set `CAMERA` to the created camera number. for me it was `5` and `6`.

19. run `ls -l /tmp/`, check if `timelapse_short.mp4` and `timelapse_long.mp4` exist and check if it's working on vigibot.
20. if it works, automatically start it on boot: run `sudo nano /etc/rc.local` and add the following above the line `exit 0`
```
/usr/local/timelapser/timelapser.sh > /dev/tty0 &
```
### additional information / explanations:
thanks to Pascal for some of the above instructions.
it seems `enfuse` hdr images cause ffmpeg to fail. do not set `EXPOSUREBRACKETING`
### for future reference: manual cli commands
- use most recent images for short clip. takes about 10 seconds to create.
```
#target length: 1h in 6s playback
#'-sseof 2': use only most recent 2 seconds of input
#ffmpeg may be assuming a different fps value in its -sseof calculation
#'-r 10': set conversion to 10 fps
#'-filter:v fps=fps=30': force 30 fps output so thr 30 fps vigibot captures work
```
```
sudo ffmpeg -sseof -2 -r 10 -pattern_type glob -i "/home/pi/timelapse/*.jpg" -s 640x480 -vcodec libx264 -filter:v fps=fps=30/tmp/timelapse_short.mp4 -y
```
- long clip. takes about 90 seconds to create.
```
#target length: 24h in 40s playback
#"-sseof 52": use only most recent 52 seconds of input
#ffmpeg may be assuming a different fps value in its -sseof calculation
#'-r 30': set conversion to 30 fps
#'-filter:v "setpts=0.5*PTS"': only pass 50% of the frames, drop the others. this halves timelapse_long playback duration. (e.g. '0.2' would only pass 20% of the frames).
```
```
sudo ffmpeg -sseof -52 -r 30 -pattern_type glob -i "/home/pi/timelapse/*.jpg" -filter:v "setpts=0.5*PTS" -s 640x480 -vcodec libx264 /tmp/timelapse_long.mp4 -y
```
Modifié par firened, 25 novembre 2022 - 11:15 .


