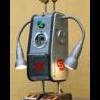

pour un premier essai, j'ai construit ce petit robot, basé sur une carte romeo...

le capteur US est monté sur un servo pour balayage
le tout (mesure de distance et commande servo) est geré par ce morceau de code , testé et opérationnel :
#include "URMSerial.h"
#include "Servo.h"
URMSerial urm;
Servo myservo; //objet servo controle un servo
int pos = 0;    // variable to store the servo position
int distance;

void setup() {
    Serial.begin(9600); // initialisation de la connexion Arduino / PC
    urm.begin(9,10,9600); // initialisation du capteur sur les pattes 9 et 10 à la vitesse 9600
myservo.attach(11);
}

void loop()
{
   // mise à jour de la distance
   urm.requestMeasurementOrTimeout(1, distance);
   // on en fait ce qu'on veut, l'afficher par exemple
   Serial.print("Distance : ");
   Serial.println(distance);
   delay(50);

  for(pos = 0; pos < 180; pos += 1)  // goes from 0 degrees to 180 degrees
  {                                  // in steps of 1 degree
    myservo.write(pos);              // tell servo to go to position in variable 'pos'
    delay(15);                       // waits 15ms for the servo to reach the position
  }
  for(pos = 180; pos>=1; pos-=1)     // goes from 180 degrees to 0 degrees
  {
    myservo.write(pos);              // tell servo to go to position in variable 'pos'
    delay(15);                       // waits 15ms for the servo to reach the position
  }
}
ensuite les 2 moteurs sont gérés par ce code, aussi testé et opérationnel
//Standard PWM DC control

int E1 = 5;     //M1 Speed Control
int E2 = 6;     //M2 Speed Control
int M1 = 4;    //M1 Direction Control
int M2 = 7;    //M1 Direction Control

///For previous Romeo, please use these pins.
//int E1 = 6;     //M1 Speed Control
//int E2 = 9;     //M2 Speed Control
//int M1 = 7;    //M1 Direction Control
//int M2 = 8;    //M1 Direction Control


void stop(void)                    //Stop
        {
          digitalWrite(E1,LOW);
          digitalWrite(E2,LOW);
        }
void advance(char a,char <img src='http://www.robot-maker.com/forum/public/style_emoticons/<#EMO_DIR#>/cool.gif' class='bbc_emoticon' alt='B)' />          //Move forward
        {
          analogWrite (E1,a);      //PWM Speed Control
          digitalWrite(M1,HIGH);
          analogWrite (E2,<img src='http://www.robot-maker.com/forum/public/style_emoticons/<#EMO_DIR#>/cool.gif' class='bbc_emoticon' alt='B)' />;
          digitalWrite(M2,HIGH);
        }
void back_off (char a,char <img src='http://www.robot-maker.com/forum/public/style_emoticons/<#EMO_DIR#>/cool.gif' class='bbc_emoticon' alt='B)' />          //Move backward
        {
          analogWrite (E1,a);
          digitalWrite(M1,LOW);
          analogWrite (E2,<img src='http://www.robot-maker.com/forum/public/style_emoticons/<#EMO_DIR#>/cool.gif' class='bbc_emoticon' alt='B)' />;
          digitalWrite(M2,LOW);
}
void turn_L (char a,char <img src='http://www.robot-maker.com/forum/public/style_emoticons/<#EMO_DIR#>/cool.gif' class='bbc_emoticon' alt='B)' />             //Turn Left
        {
          analogWrite (E1,a);
          digitalWrite(M1,LOW);
          analogWrite (E2,<img src='http://www.robot-maker.com/forum/public/style_emoticons/<#EMO_DIR#>/cool.gif' class='bbc_emoticon' alt='B)' />;
          digitalWrite(M2,HIGH);
        }
void turn_R (char a,char <img src='http://www.robot-maker.com/forum/public/style_emoticons/<#EMO_DIR#>/cool.gif' class='bbc_emoticon' alt='B)' />             //Turn Right
        {
          analogWrite (E1,a);
          digitalWrite(M1,HIGH);
          analogWrite (E2,<img src='http://www.robot-maker.com/forum/public/style_emoticons/<#EMO_DIR#>/cool.gif' class='bbc_emoticon' alt='B)' />;
          digitalWrite(M2,LOW);
        }
void setup(void)
{
    int i;
    for(i=4;i<=7;i++)
    pinMode(i, OUTPUT);
    Serial.begin(9600);      //Set Baud Rate
}
void loop(void)
{
     char val = Serial.read();
     if(val!=-1)
       {
          switch(val)
           {
             case '2'://Move Forward
                     advance (100,100);   //move forward in max speed
                     break;
             case '1'://Move Backward
                     back_off (100,100);   //move back in max speed
                     break;
             case '3'://Turn Left
                     turn_L (50,50);
                     break;
             case '4'://Turn Right
                     turn_R (50,50);
                     break;
            }
          delay(500);
       }
      else stop();
}
maintenant, j'aimerai me servir des distances lues par le capteur pour gerer les moteurs...
et là, je bute!
pouvez-vous m'aider?
en vous remerciant
@+