Super, je n'avais pas vu ta video...je ne suis pas sûr d'avoir cette patience là...combien de maillons faut-il pour 10cm de chenilles ?

55cm, char grimpeur
Débuté par Oracid, mai 14 2018 05:07
67 réponses à ce sujet
#21

pmdd
-

- Membres
-

- 1â¯169 messages
Membre chevronné
- Gender:Male
Posté 16 janvier 2019 - 12:45
- Mulsore aime ceci
Le robot semeur, Découpeur de gâteau, ouvreur de yaourt, allumeur de bougies, le grimpeur à la corde, Le labyrinthe et bien d'autres encore !
#22
Oracid
-
- Modérateur
-
- 7â¯030 messages
Pilier du forum
- Gender:Male
Posté 16 janvier 2019 - 01:54
Facile ! Compte 1cm par maillon. Exactement, 11,45mm.combien de maillons faut-il pour 10cm de chenilles ?
Une chenille de 10cm ? T'es sûr ?!
Ma chaine YouTube : https://www.youtube..../oracid1/videos
#23
pmdd
-
- Membres
-
- 1â¯169 messages
Membre chevronné
- Gender:Male
Posté 16 janvier 2019 - 04:11
Facile ! Compte 1cm par maillon. Exactement, 11,45mm.
Une chenille de 10cm ? T'es sûr ?!
non non, ma question était juste pour voir un ratio nb maillons/longueur, j'imagine évidement des chenilles plus longues si tenté que je fasse effectivement des chenilles ! 
Le robot semeur, Découpeur de gâteau, ouvreur de yaourt, allumeur de bougies, le grimpeur à la corde, Le labyrinthe et bien d'autres encore !
#24
Red
-

- Membres
- 9 messages
Nouveau membre
Posté 21 janvier 2019 - 03:44
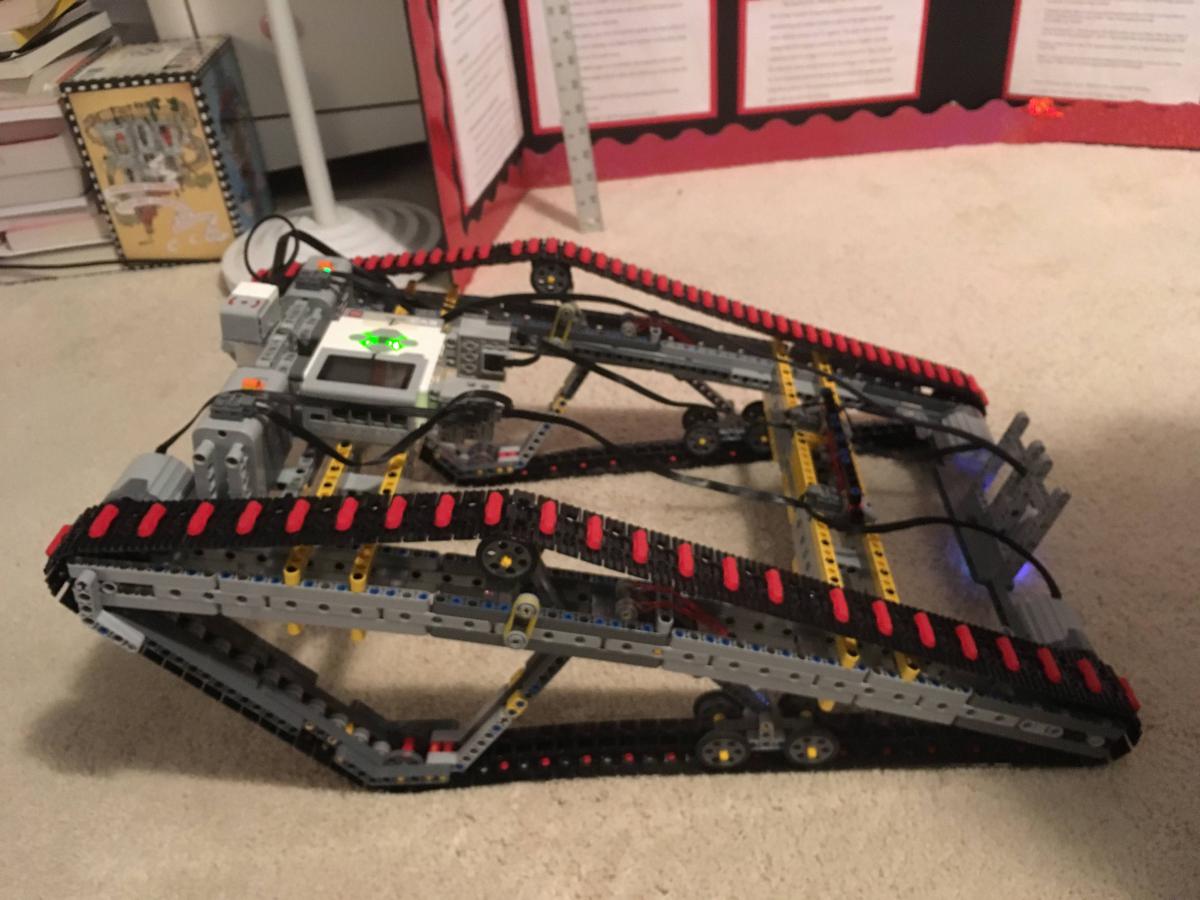
Hello, I'm trying to create a stair climbing tank similar to yours, and I'd like to recreate your suspension mechanisms. Is there any chance you can post a picture of the back suspension by itself?
#25
Oracid
-
- Modérateur
-
- 7â¯030 messages
Pilier du forum
- Gender:Male
Posté 21 janvier 2019 - 07:57
Hello
Happy to see you here. Here some pictures, but don't hesitate to ask more if needed.
Please, show us what you are making and what is for.
Where do you come from ?
Click on me to see bigger.


Happy to see you here. Here some pictures, but don't hesitate to ask more if needed.
Please, show us what you are making and what is for.
Where do you come from ?
Click on me to see bigger.
Ma chaine YouTube : https://www.youtube..../oracid1/videos
#27
Oracid
-
- Modérateur
-
- 7â¯030 messages
Pilier du forum
- Gender:Male
Posté 22 janvier 2019 - 07:47
I am afraid not. Your tank is too heavy because of the EV3 and the 2 battery box. And most important, my rubber track.it is able to climb stairs up to 22cm tall.
I have not try the Lego rubber track, https://www.bricklin...&O={"iconly":0}but I guess my rubber is better.
My tank is a prototype with no EV3 and very light Lego LiPo batteries.
In my opinion, you must first make a simple prototype like mine. Then you see how it works in your stairs. And after, you must adapt to your goal.
In France, stairs height are 16cm outside and 17cm inside. The slope is about 30°. These parameters are regulatory.
In this video, I show how to adapt the rubber to Lego track, 'https://www.youtube....bW_zlPqZQ&t=2s'if you do not have the patience to make it, you can use real rubber band like in my first video, 'https://www.youtube....JX5UxPy8&t=51s'
To make a 22cm stairs climber, the tank must be 22cm high and because of the stair width and the slope, you may have to make it 5cm longer, maybe more. You have to try with your prototype.
Anyway, you are in the right direction ! Don't hesitate to ask more questions and tell us more about you.
Ma chaine YouTube : https://www.youtube..../oracid1/videos
#28
pmdd
-
- Membres
-
- 1â¯169 messages
Membre chevronné
- Gender:Male
Posté 22 janvier 2019 - 08:00
Facile ! Compte 1cm par maillon. Exactement, 11,45mm.
Une chenille de 10cm ? T'es sûr ?!
Bonjour, question basique, sur des chenilles l'entraînement doit être derrière ou devant ?
Le robot semeur, Découpeur de gâteau, ouvreur de yaourt, allumeur de bougies, le grimpeur à la corde, Le labyrinthe et bien d'autres encore !
#29
Oracid
-
- Modérateur
-
- 7â¯030 messages
Pilier du forum
- Gender:Male
Posté 22 janvier 2019 - 08:07
Je me suis posé la même question.Bonjour, question basique, sur des chenilles l'entraînement doit être derrière ou devant ?
Sur mes chars, en raison de la faible puissance des moteurs Lego, j'en mets 2x2, 2 à l'avant et 2 à l'arrière. Regarde les photos au début du fil.
On pourrait penser au problème de dérive de vitesse d'un moteur à l'autre, mais dans la pratique le problème ne se pose pas.
Ma chaine YouTube : https://www.youtube..../oracid1/videos


#31
Donovandu88
-

- Membres
-
- 680 messages
Membre passionné
- Gender:Male
Posté 22 janvier 2019 - 11:15
J'allais dire exactement la même chose que toi Forthman 🤣.
Même sur les bulldozers, les barbotins sont à l'arrière.
Même sur les bulldozers, les barbotins sont à l'arrière.
#32
Path
-

- Modérateur
-
- 2â¯504 messages
Made By Humans
- Gender:Male
- Location:Paris
Posté 22 janvier 2019 - 12:27
Nice one !!
#33
Red
-
- Membres
- 9 messages
Nouveau membre
Posté 22 janvier 2019 - 02:20
22 cm has worked for me so far, I'm using cardboard boxes as stairs, so they might be compressing with the weight of the robot, I'll do some more tests with stronger boxes, and send a video. I have the EV3 brick on it right now, in order to do testing with the sensors, but after my science fair project is completed, I will be taking it off, and work on making it lighter. I've also found that having the 2 larger battery boxes increases the maximum torque of the motors, since they give out 11.4 V of power, rather than 7.4 V, which makes it easier to climb up the stairs. I removed the EV3 sensors, and weighed the robot. It has a weight between 1.7 and 1.72 KG. It appears that the weight of the large battery boxes is offset by the use of the SBricks, instead of IR control.
- Forthman aime ceci
#34
Red
-
- Membres
- 9 messages
Nouveau membre
Posté 22 janvier 2019 - 03:59
How did you make the stairs that are shown in your videos? I'm interested in making a stairway of my own to test with.
#35
Red
-
- Membres
- 9 messages
Nouveau membre
Posté 22 janvier 2019 - 04:01
Will using D-Joint on my tracks affect them permanently, or can it be removed?
#36
Oracid
-
- Modérateur
-
- 7â¯030 messages
Pilier du forum
- Gender:Male
Posté 22 janvier 2019 - 05:22
Well, it is difficult to put the D-joint on. So it is better you don't remove them.Will using D-Joint on my tracks affect them permanently, or can it be removed?
The links tread are not so expensive, about 0.06€, so it is better to buy new ones. https://store.brickl...ID":"91081149"}
1.72kg, it is very good !
Yes the battery boxes give more power, it is a good choice. May be one could be enough, you have to try. SBrick is good too.
22cm, this is very good ! How much is the slope ? You can test with cellular phone angle application.
What I use in my first videos looks like cardboard but it is not, it is plastic board. It is better because you can use it outside. You can find them in big store in water bottle pallet, between two levels. Don't forget to make the step stair nosing. This is very important.
In my opinion, the best way is to make stairs with wood.
I am very impatient to see your video.
- Mike118 aime ceci
Ma chaine YouTube : https://www.youtube..../oracid1/videos
#37
Red
-
- Membres
- 9 messages
Nouveau membre
Posté 29 janvier 2019 - 09:16
Well, it is difficult to put the D-joint on. So it is better you don't remove them.
The links tread are not so expensive, about 0.06€, so it is better to buy new ones. https://store.brickl...ID":"91081149"}
1.72kg, it is very good !
Yes the battery boxes give more power, it is a good choice. May be one could be enough, you have to try. SBrick is good too.
22cm, this is very good ! How much is the slope ? You can test with cellular phone angle application.
What I use in my first videos looks like cardboard but it is not, it is plastic board. It is better because you can use it outside. You can find them in big store in water bottle pallet, between two levels. Don't forget to make the step stair nosing. This is very important.
In my opinion, the best way is to make stairs with wood.
I am very impatient to see your video.
https://docs.google....dit?usp=sharing
I'm working on a video too!
#38
Red
-
- Membres
- 9 messages
Nouveau membre
Posté 29 janvier 2019 - 09:23
I know that using D-Joint is far superior to the LEGO red track inserts when it comes to gaining traction, and I know that you've tried to use them, but what caused you not to show off an attempt with them in one of your videos?
#39
Oracid
-
- Modérateur
-
- 7â¯030 messages
Pilier du forum
- Gender:Male
Posté 30 janvier 2019 - 07:58
Well, as you can imagine, I did a lot of tests of different materials.
If I had to make a video every time, I should have made more than a hundred videos.
Besides, I do not even remember if I tested these blocks.
There is a very simple test. Take a very slippery board bent at 40 °.
Put the material on it. If it slips, it's not good.
Try with a rubber band, and you will see it does not slip.
Ma chaine YouTube : https://www.youtube..../oracid1/videos
#40
levend
-

- Membres
-
- 5â¯722 messages
Pilier du forum
- Gender:Male
- Location:Vendée
- Interests:Robotique, informatique, architecture et patrimoine...
Posté 07 avril 2019 - 10:01
C'est le plus petit char grimpeur que tu as construit ?
Imprimante 3D : Prusa i3 (MK1) + CR-10S + CR-10 S5 + Artillery Sidewinder X2 + CR-30 + Elegoo Mars + Anycubic Wash & cure 2 + Phrozen Sonic Mega 8K + Phrozen Cure Mega + Tronxy VEHO 600 PRO


0 utilisateur(s) li(sen)t ce sujet
0 members, 0 guests, 0 anonymous users

