Aller au contenu


Photo
- - - - -

Help - Freemove Car Kit on Vigibot


20 réponses à ce sujet

#1 efarnioli

efarnioli

    Membre

  • Membres
  • 12 messages

Posté 03 janvier 2022 - 03:10

Hi,

following a help request on discord, I'm trying to run my freemove 4wd car kit on vigibot.

For reference, I am talking about this kit here: 

https://www.amazon.c...1?ie=UTF8&psc=1


It seems that the robot is using PCA9685 chips. From the original code of the car it is possible to figure out that the channels used for the motors of the wheels are 

Left front motor => channels 0,1;
Left rear motor => channels 3,2; (in this order)
Right front motor => channels 6,7;
Right rear motor => channels 4,5;

the pan and tilt for the head are on channels 8 and 9
 
How can I go from this information to have the car kit moving using vigibot?
Please note that the car is alive on vigibot, I can see the camera correctly.
Thank you for any help :)
 
Edoardo


#2 firened

firened

    Membre

  • Membres
  • 43 messages
  • Gender:Male

Posté 03 janvier 2022 - 04:14

Hello Edoardo

Good. I checked onto which registers the code ( https://github.com/F...Server/Motor.py) writes, then checked the PCA9685 Datasheet to see which channels these registers corresponds to. https://cdn-shop.ada...ets/PCA9685.pdf
so the PCA channels you wrote are correct.

i mentioned the motor driver enable pin kEN) in the chat, but i cannot find any pin toggle when running the sample code, so possibly the EN is hardwired active already. ok.

I'm checking what config should work, I'll post here again shortly.

#3 firened

firened

    Membre

  • Membres
  • 43 messages
  • Gender:Male

Posté 03 janvier 2022 - 04:33

i can write what i *think* is necessary but I'd be happy if mike118 can take a look too and verify.

you already correctly set pca9685 address.

in hw config -> OUTPUT -> 4
adjust values to the following:
      "NAME": "Left wheel front",
      "TYPE": "PwmPwm",
      "ADRESSE": 0,
      "GPIOS": [
        0,
        1
      ],
      "SLEEPMODES": [
        "Floating",
        "Floating"
      ],
(you may have to change layout to "Tree", so you can add entries.)

after that one motor should run. if it does work, the next step is to dublicate the entry for wheel left back.

#4 efarnioli

efarnioli

    Membre

  • Membres
  • 12 messages

Posté 03 janvier 2022 - 06:20

Output 4 is what by default is

      "NAME": "Gripper tilt",
      "TYPE": "Servos",
      "ADRESSE": -1,
      "GPIOS": [
        8
      ],
 
right?
Why in output 4? I am a bit lost about how did you arrive to that and about the fact that in the default configuration there's one output for "left wheels" and one for "right wheels", but it seems you are suggesting to have 4 outputs instead, one for each wheel... is that correct?
 
Anyway, trying the configuration you suggested, and saved, after I pushed on the interface the arrow 'up' the front left wheel start spinning fast... and don't stop anymore, neither pressing other buttons...
Probably getting there, but not quite yet! :)


#5 firened

firened

    Membre

  • Membres
  • 43 messages
  • Gender:Male

Posté 03 janvier 2022 - 07:01

hahah well that's something that the motor runs. It means that the enable pin is permanently enabled by default. good.

i used output 4 because that's what i saw on your screenshot. note that the entry labeled "4" is actually the 5th entry as the array starts at "0". it should be the default "Left wheel" entry.
yes normally "Left wheel" will control both wheels on the left side because both left motors will be hooked up to one driver. so 1 driver for left 2 motors and 1 driver for right 2 motors, but your kit has 4 drivers, one for each motor, so we will require 4 entries in your config :)

makes sense so far?

have you tried to use the interface joystick? (dragging the dot in the middle of the 4 arrows)
the joystick auto stops when you let go, does it still spin afterwards? if yes, set both SLEEPMODES entries to "Low" instead of "Floating".

and make sure you don't use the same "GPIO" pin in multiple entries.

edit to add: btw with a driver for each motor you will have the possibility of changing your wheels to mecaanum wheels later on. similar to the robot mecaanum or pancake.

#6 firened

firened

    Membre

  • Membres
  • 43 messages
  • Gender:Male

Posté 03 janvier 2022 - 07:12

hmm what i wrote about SLEEPMODES is not correct. that doesn't make a difference.

your motor will stop when you use the default "Left wheel" entry. this entry will have the correct OUTS values that are not correct in the entry "Gripper tilt" that you used

#7 efarnioli

efarnioli

    Membre

  • Membres
  • 12 messages

Posté 03 janvier 2022 - 08:17

Ah ok so nothing special behind output 4!

It makes sense, just not sure how did you arrive to the conclusion that there are 4 drivers on this kit... 


I tried to use the real output 4 (the one originally named "Left wheels"), but I got the same behaviour= left forward wheel spinning permanently.

Using the joystick doesn't change... still same behaviour


I checked possible conflict with the other outputs about gpio numbers, and there is no apparent conflict... however I'm not sure this is a correct check because all the other outputs are set with address = -1


Could be worth trying cancelling out all the output and leaving in place only the one we are trying to use?


#8 firened

firened

    Membre

  • Membres
  • 43 messages
  • Gender:Male

Posté 03 janvier 2022 - 09:32

i figured it has 4 drivers since the provided code sets the speed for each motor separately onto separate PCA channels (2 channels x 4 motors = 8 channels). if it had only 2 drivers with 2 motors each then only speed for each side would have to be set. Plus: only one motor spinning would not be possible like it does now, both left motors would spin.

yes correct, no GPIO conflict with the OUTPUTs that use ADDRESS:0

i would leave as much as possible of the config with the default values.


so what next, hmm. i don't know why it spins and never stops :(
i would recommend to dublicate "Left wheel front" and modify to "Left wheel back" with the appropriate channel GPIO and see if it behaves the same.

Also adjusting the entry "Right wheels" to use "Right wheel front" similar to my first reply in this thread but for the right front motor.

with both of those we should be able to determine whether it's a problem with the hardware or our config.
(if it doesn't work we can try "PwmPwmDir" instead of "PwmPwm", it will also require setting a channel pin that we won't use but maybe this will change the behavior.)

#9 Mike118

Mike118

    Staff Robot Maker

  • Administrateur
  • PipPipPipPipPip
  • 9 934 messages
  • Gender:Male
  • Location:Anglet
  • Interests:Robotique, Entrepreneuriat, Innovation, Programmation, Résolution de problème, Recherche de solutions, Mécanique, Electronique, Créer, Concevoir

Posté 04 janvier 2022 - 06:43

Hello, 

According to the information given your config should look like something like that : 

the pan and tilt for the head are on channels 8 and 9 on PCA9685 => Set on outputs 0 and 1 => Gpio set to 8 and 9 and pca adress set to 0
No gripper on your robot ? I removed the unused outputs
Front and rear left and right wheel are set on outputs 2 3 4 and 5. => Pwm Pwm need to change "outs" values because they are different for servo and pwm.
No light, no led no buzzers, I removed all other unused outputs, we could add them back later if needed.


{
  "OUTPUTS": [
    {
      "NAME": "Turret pan",
      "TYPE": "Servos",
      "ADRESSE": 0,
      "GPIOS": [
        8
      ],
      "SLEEPMODES": [
        "Low"
      ],
      "INS": [
        -90,
        90
      ],
      "OUTS": [
        500,
        2500
      ],
      "BACKSLASH": 0,
      "COMMANDS16": [
        0
      ],
      "GAINS16": [
        -1
      ],
      "COMMANDS8": [],
      "GAINS8": [],
      "COMMANDS1": [],
      "GAINS1": []
    },
    {
      "NAME": "Turret tilt",
      "TYPE": "Servos",
      "ADRESSE": 0,
      "GPIOS": [
        9
      ],
      "SLEEPMODES": [
        "Low"
      ],
      "INS": [
        -90,
        90
      ],
      "OUTS": [
        500,
        2500
      ],
      "BACKSLASH": 0,
      "COMMANDS16": [
        1
      ],
      "GAINS16": [
        -1
      ],
      "COMMANDS8": [],
      "GAINS8": [],
      "COMMANDS1": [],
      "GAINS1": []
    },
    {
      "NAME": "Left wheel front",
      "TYPE": "PwmPwm",
      "ADRESSE": 0,
      "GPIOS": [
        0,
        1
      ],
      "SLEEPMODES": [
        "Low",
        "Low"
      ],
      "INS": [
        -100,
        -1,
        1,
        100
      ],
      "OUTS": [
        -100,
        0,
        0,
        100
      ],
      "BACKSLASH": 0,
      "COMMANDS16": [],
      "GAINS16": [],
      "COMMANDS8": [
        1,
        2
      ],
      "GAINS8": [
        1,
        -1
      ],
      "COMMANDS1": [],
      "GAINS1": []
    },
    {
      "NAME": "Left wheel rear",
      "TYPE": "PwmPwm",
      "ADRESSE": 0,
      "GPIOS": [
        3,
        2
      ],
      "SLEEPMODES": [
        "Low",
        "Low"
      ],
      "INS": [
        -100,
        -1,
        1,
        100
      ],
      "OUTS": [
        -100,
        0,
        0,
        100
      ],
      "BACKSLASH": 0,
      "COMMANDS16": [],
      "GAINS16": [],
      "COMMANDS8": [
        1,
        2
      ],
      "GAINS8": [
        1,
        -1
      ],
      "COMMANDS1": [],
      "GAINS1": []
    },
    {
      "NAME": "Right wheel front",
      "TYPE": "PwmPwm",
      "ADRESSE": 0,
      "GPIOS": [
        6,
        7
      ],
      "SLEEPMODES": [
        "Low",
        "Low"
      ],
      "INS": [
        -100,
        -1,
        1,
        100
      ],
      "OUTS": [
        -100,
        0,
        0,
        100
      ],
      "BACKSLASH": 0,
      "COMMANDS16": [],
      "GAINS16": [],
      "COMMANDS8": [
        1,
        2
      ],
      "GAINS8": [
        -1,
        -1
      ],
      "COMMANDS1": [],
      "GAINS1": []
    },
    {
      "NAME": "Right wheel rear",
      "TYPE": "PwmPwm",
      "ADRESSE": 0,
      "GPIOS": [
        4,
        5
      ],
      "SLEEPMODES": [
        "Low",
        "Low"
      ],
      "INS": [
        -100,
        -1,
        1,
        100
      ],
      "OUTS": [
        -100,
        0,
        0,
        100
      ],
      "BACKSLASH": 0,
      "COMMANDS16": [],
      "GAINS16": [],
      "COMMANDS8": [
        1,
        2
      ],
      "GAINS8": [
        -1,
        -1
      ],
      "COMMANDS1": [],
      "GAINS1": []
    }
  ],
  "PCA9685ADDRESSES": [
    64
  ]
}

You can try that and tell if it works.

Si mon commentaire vous a plus laissez nous un avis  !  :thank_you:

Nouveau sur Robot Maker ? 

Jetez un oeil aux blogs, aux tutoriels, aux ouvrages, au robotscope  aux articles,  à la boutique  et aux différents services disponible !
En attendant qu'une bibliothèque de fichiers 3D soit mise en place n'hésitez pas à demander si vous avez besoin du fichier 3D d'un des produits de la boutique... On l'a peut être ! 
Si vous souhaitez un robot pilotable par internet n'hésitez pas à visiter www.vigibot.com et à lire le sous forum dédié à vigibot!


Les réalisations de Mike118  


#10 efarnioli

efarnioli

    Membre

  • Membres
  • 12 messages

Posté 04 janvier 2022 - 11:00

:clapping:  :clapping:  :clapping:

Happiness and Joy!!


The car works!


details: copy-paste the whole list of commands I get an error about invalid syntax, i didn't manage to understand why so far. Anyway, manually introducing the commands related to the four motors the car works very well..

it is still not perfect though

The commands on the web interface seems to be "rotated":

Pushing the joystick on the right the car goes straight;

Pushing the joystick up the car goes right;

Pushing the joystick on the left the car goes backwards;

Pushing the joystick down the car goes left.


Probably Mike I ask too much if I want to know how did you arrive to that command configurations, can I ask what should I study to understand the reasoning behind?

thank you for the help :)


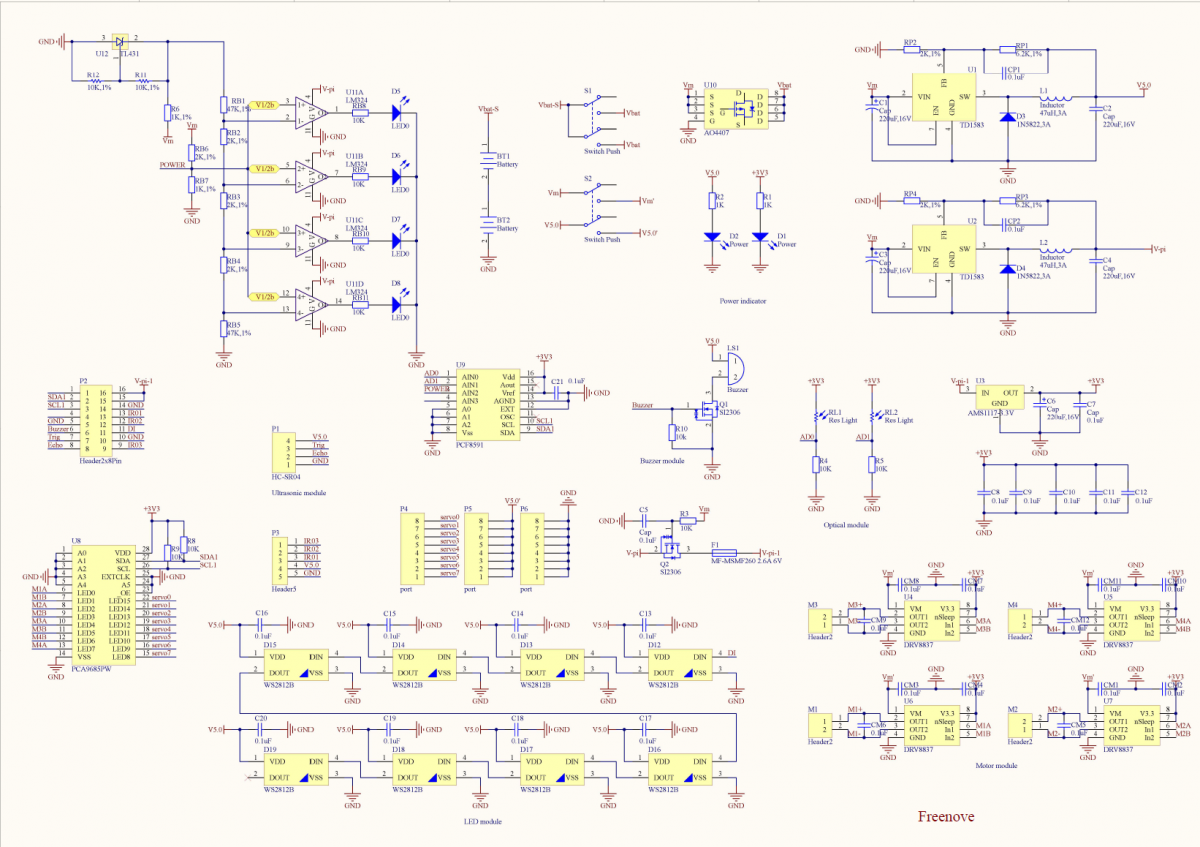
I guess it is not relevant anymore, but i manage to get the schematic 


#11 efarnioli

efarnioli

    Membre

  • Membres
  • 12 messages

Posté 04 janvier 2022 - 11:03

schematic attached


Image(s) jointe(s)

  • schematic.png


#12 firened

firened

    Membre

  • Membres
  • 43 messages
  • Gender:Male

Posté 04 janvier 2022 - 11:17

oh very cool it's working.

there's a comma too much in the config:
    },
,
    {
      "NAME": "Right wheel rear",
probably why you got an invalid syntax error.
but glad it's running now!

regarding the rotation, i *think* you simply have to invert the GAINS8 on both "Right wheel" entries. remove the minus sign so it looks like this:
      "GAINS8": [
        1,
        1
      ],


#13 firened

firened

    Membre

  • Membres
  • 43 messages
  • Gender:Male

Posté 04 janvier 2022 - 11:32

nice you found the schematic. i can see the 4 DRV8837 drivers and how they're connected.
the active buzzer is indeed on the raspberry pi GPIO 17.

#14 efarnioli

efarnioli

    Membre

  • Membres
  • 12 messages

Posté 04 janvier 2022 - 01:04

yes, indeed, reversing the gain it works properly :thank_you:


Question:

in a code like that

"NAME": "Right wheel rear",
"TYPE": "PwmPwm",
"ADRESSE": 0,
"GPIOS": [
4,
5
],
"SLEEPMODES": [
"Low",
"Low"
],
"INS": [
-100,
-1,
1,
100
],
"OUTS": [
-100,
0,
0,
100
],
"BACKSLASH": 0,
"COMMANDS16": [],
"GAINS16": [],
"COMMANDS8": [
1,
2
],

"GAINS8": [

-1,
-1
],


I get the reasons behind name, type, address, gpios, sleppmodes..

how does one argue the values for INS, OUTS, COMMANDS8, GASINS8 ?

thanks :)


#15 firened

firened

    Membre

  • Membres
  • 43 messages
  • Gender:Male

Posté 05 janvier 2022 - 02:59

there's an entry here with some info about that: https://www.wiki-vig...ion_matérielle

i was planning to explain it more to you but other things are getting in between.
note that many things in the hardware config and remote control config connect together. you might have to look at both configs to see their relation.

the pan tilt servos work too right? and the buzzer?

#16 Mike118

Mike118

    Staff Robot Maker

  • Administrateur
  • PipPipPipPipPip
  • 9 934 messages
  • Gender:Male
  • Location:Anglet
  • Interests:Robotique, Entrepreneuriat, Innovation, Programmation, Résolution de problème, Recherche de solutions, Mécanique, Electronique, Créer, Concevoir

Posté 05 janvier 2022 - 03:25

:clapping:  :clapping:  :clapping:

Happiness and Joy!!


The car works!


details: copy-paste the whole list of commands I get an error about invalid syntax, i didn't manage to understand why so far. Anyway, manually introducing the commands related to the four motors the car works very well..


Firened was right I mistyped and a wrong coma was inserted.


oh very cool it's working.

there's a comma too much in the config:

    },
,
    {
      "NAME": "Right wheel rear",
probably why you got an invalid syntax error.
but glad it's running now!


it is still not perfect though

The commands on the web interface seems to be "rotated":

Pushing the joystick on the right the car goes straight;

Pushing the joystick up the car goes right;

Pushing the joystick on the left the car goes backwards;

Pushing the joystick down the car goes left.


Firened was right again, 


oh very cool it's working.

there's a comma too much in the config:

    },
,
    {
      "NAME": "Right wheel rear",
probably why you got an invalid syntax error.
but glad it's running now!

regarding the rotation, i *think* you simply have to invert the GAINS8 on both "Right wheel" entries. remove the minus sign so it looks like this:
      "GAINS8": [
        1,
        1
      ],


you just have to adjust the gain or in this case you could also just reverse the Gpios order, set 7 6   and 5 4 instead of 6 7  and 4 5. 
This would have made the same result as changing the gains. 


Probably Mike I ask too much if I want to know how did you arrive to that command configurations, can I ask what should I study to understand the reasoning behind?

thank you for the help :)


The answer is here :  https://www.robot-ma...relais-et-leds/
Unfortunately for you it is in french, but you can use google translate. 

If you want to help me and thanks me you can translate this and create a new post with the translation ;) It will help futur non french people :) If you don't understand some points I can help you understand them and complete the translation :)


Si mon commentaire vous a plus laissez nous un avis  !  :thank_you:

Nouveau sur Robot Maker ? 

Jetez un oeil aux blogs, aux tutoriels, aux ouvrages, au robotscope  aux articles,  à la boutique  et aux différents services disponible !
En attendant qu'une bibliothèque de fichiers 3D soit mise en place n'hésitez pas à demander si vous avez besoin du fichier 3D d'un des produits de la boutique... On l'a peut être ! 
Si vous souhaitez un robot pilotable par internet n'hésitez pas à visiter www.vigibot.com et à lire le sous forum dédié à vigibot!


Les réalisations de Mike118  


#17 efarnioli

efarnioli

    Membre

  • Membres
  • 12 messages

Posté 06 janvier 2022 - 03:18

ah good thanks a lot :)

today i am busy with other stuff, tomorrow I should have the possibility to spend time on it


#18 efarnioli

efarnioli

    Membre

  • Membres
  • 12 messages

Posté 11 janvier 2022 - 03:28

Hi all,

I published the english version of the guide about how to set up your robot on vigibot, please let me know if something is not clear enough in the translated version.


From my perspective, the thing that is less clear is how to conlcude if your robot needs the type PwnmPwm, PwmDir or other...

Maybe few examples more about this could be beneficial for people who are new to this


#19 Mike118

Mike118

    Staff Robot Maker

  • Administrateur
  • PipPipPipPipPip
  • 9 934 messages
  • Gender:Male
  • Location:Anglet
  • Interests:Robotique, Entrepreneuriat, Innovation, Programmation, Résolution de problème, Recherche de solutions, Mécanique, Electronique, Créer, Concevoir

Posté 11 janvier 2022 - 04:07


From my perspective, the thing that is less clear is how to conlcude if your robot needs the type PwnmPwm, PwmDir or other...

Maybe few examples more about this could be beneficial for people who are new to this


With some specific examples :


L9110 is a board that use PwmPwm,  the driver have only inA and inB, reversing those inputs reverse the motor direction.
L298 is a board that use PwmDirDir, the driver have a PWM/enable  + inA and InB.  For the particular case we can use PwmPwm if enable pin is forced to " run state " 
Cytron is a board tha use PwmDir, the driver have only two inputs, pwm and direction. Pwm mode alone can be used if you don't need to reverse the direction of the motor.
Servo driver is a board that require the same servo signal as for servo with only one input. 
PCA servo can be used to drive servomotors or any other of the board above by setting correctly the gpio and type and specifying pca address

PCA with motor driver included  this one include pca board + t6612fng woking with PwmDirDir mode.


You need to understand what are the different mode available, and understand how is working the board you want to use. The you just have to choose the matching one =)  


( And thank you for the translation ;) )


Si mon commentaire vous a plus laissez nous un avis  !  :thank_you:

Nouveau sur Robot Maker ? 

Jetez un oeil aux blogs, aux tutoriels, aux ouvrages, au robotscope  aux articles,  à la boutique  et aux différents services disponible !
En attendant qu'une bibliothèque de fichiers 3D soit mise en place n'hésitez pas à demander si vous avez besoin du fichier 3D d'un des produits de la boutique... On l'a peut être ! 
Si vous souhaitez un robot pilotable par internet n'hésitez pas à visiter www.vigibot.com et à lire le sous forum dédié à vigibot!


Les réalisations de Mike118  


#20 firened

firened

    Membre

  • Membres
  • 43 messages
  • Gender:Male

Posté 12 janvier 2022 - 07:53

well done @efarnioli


@mike, will this translation be added to the documentation thread? https://www.robot-ma...fr/#entry105817

the french link is not working for
"How to configure the motors drivers I use on my robot with Vigibot? Comment configurer les drivers de moteurs que j'utilise sur vigibot ?"

also there's probably a thread for the entries on how to change voice (don't know which one is best), and probably a thread for the openCV question i think?


Répondre à ce sujet


0 utilisateur(s) li(sen)t ce sujet

0 members, 0 guests, 0 anonymous users